Benefits & Features
- All wetted parts are sealed within a high pressure casing. Outer window tube with scale does not come in contact with medium
- Unrestricted mounting…install the monitor in any orientation-horizontal, vertical or inverted
- Can be used with oil or opaque liquids. Also avialible options for air & gases
- Uses the variable annular orifice technique in tandem with a transfer magnet and compression spring. The sharp-edged Stainless Steel orifice provides excellent measurement stability to a minimum of 500 SSU viscosity
- Has a measuring accuracy of ±2.5% of full scale in the center third of the measuring range, and a ±4% of full scale accuracy over the entire flow measuring range
- Weather-tight external construction (BASIC style only, when used with Buna-N window seals) for use outdoors and/or on systems where wash downs are required
- Will provide years of maintenance-free performance
Meter Type
High pressure magnetic follower flow rate monitor for; liquids @ 1.00 Specific Gravity, oil @ 0.873 Specific Gravity, and air @ 100 PSIG.
How It Works
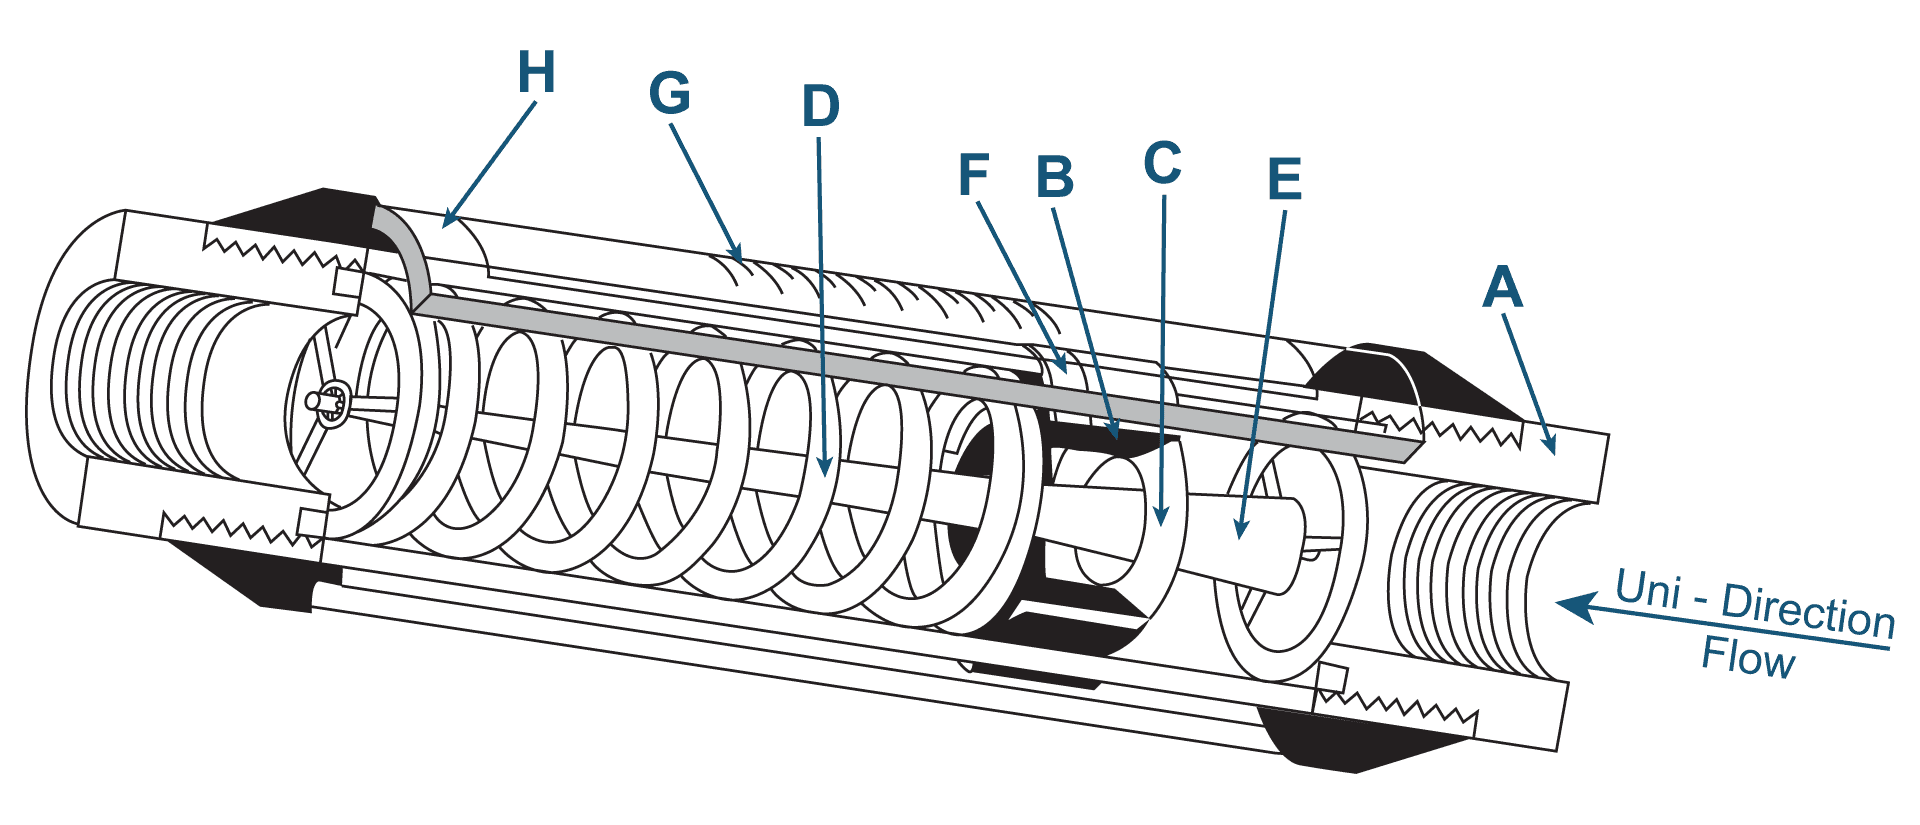
Enclosed within a high-pressure casing (A), a high-strength magnet (B) in tandem with the sharp-edged annular orifice disk (C), is pressed towards the zero flow rate position by a linear rate compression spring (D). A tapered metering shaft (E) is positioned concentrically within the annular orifice disk and provides a variable-area opening that increases by the square of linear displacement of the orifice disk. Fluid flow creates a pressure differential across the orifice disk, pressing the magnet/orifice disk duo against the compression spring. The flow rate is read by aligning the magnetically coupled follower (F) with the graduated scale (G) located within the environmentally sealed window (H). The variable-area orifice design provides pressure differentials and orifice displacements that are linearly proportional to the fluid flow rate.

Note:
- High temperature Styles are derated, please inquire with Ernst Instruments Sales.
- *For Air & Gas applications operating to 400°F, Style H can be substituted.
Options
- Optional Gaskets/Seals available on request
- See Matrix for standard options
Application Notes:
- Compatibility: Before ordering, verify all materials are compatible with the service media(s), intermittently used cleaners, the environment, and cleaning processes in conjunction with the temperatures and pressures of the application(s) and future applications. Ernst Instruments does not make chemical compatibility recommendations. Compatibility is the responsibility of the user and/or specifying party.
![]() WARNING: This product can expose you to certain chemicals, which are known to the State of California to cause cancer or birth defects or other reproductive harm. For more information go to: www.P65Warnings.ca.gov
WARNING: This product can expose you to certain chemicals, which are known to the State of California to cause cancer or birth defects or other reproductive harm. For more information go to: www.P65Warnings.ca.gov
Replacement Parts
- Please contact our Sales Dept. sales@ernstinstruments.com or call 888-943-5000


